Showing posts with label ubuntu. Show all posts

Tuesday, August 31, 2010

Installing Virtualbox 3.x with USB support in Ubuntu 10.04 (Part 1)

VirtualBox is an x86 virtualization software package, originally created by German software company innotek GmbH, purchased by Sun Microsystems, and now developed by Oracle Corporation as part of its family of virtualization products. It is installed on an existing host operating system; within this application, additional guest operating systems, each known as a Guest OS, can be loaded and run, each with its own virtual environment.
Supported host operating systems include Linux, Mac OS X, Windows XP, Windows Vista, Windows 7 and Solaris; there is also a port to FreeBSD (only OSE version). Supported guest operating systems include a small number of versions of NetBSD and various versions of DragonFlyBSD, FreeBSD, Linux, OpenBSD, OS/2 Warp, Windows, Solaris, Haiku, Syllable, ReactOS and SkyOS. The current beta version (3.2) also allows limited virtualization of Mac OS X 10.6.
There are two versions of the VirtualBox software.
The full VirtualBox package comes under a proprietary Personal Use and Evaluation License (PUEL), which allows using the software free of charge for personal and educational use and evaluation of the product. Licenses for commercial deployment of the full VirtualBox package can be purchased from Oracle, although commercial use by individuals within a company is covered by the free PUEL.
A second version called the VirtualBox Open Source Edition (OSE) is free software released under the GNU General Public License (GPL), from which the following closed-source features are missing:
  • The built-in Remote Desktop Protocol (RDP) server
  • USB support (see below) and the combination of running the RDP server with support of remote USB devices
In the "full release" (not in the open-source edition), a USB controller is emulated (both USB 1.1 and USB 2.0) so that any USB devices attached to the host can be seen in the guest. If VirtualBox acts as an RDP server, it can also use USB devices on the remote RDP client as if they were connected to the host.
Here's part 1 of 2 how to install Virtualbox 3.x with USB support in Ubuntu 10.04:

Step 1. Adding virtualbox repository in sources.list. Open terminal by pressing Ctrl+Alt+T.

Step 2. Run this command on the terminal:
sudo gedit /etc/apt/sources.list
Enter password to proceed.

Step 3. Add this line in the repository list: 
deb http://download.virtualbox.org/virtualbox/debian karmic non-free
Save it by clicking "Save" toolbar.

Step 3. Back to terminal. Run this command:
wget -q http://download.virtualbox.org/virtualbox/debian/oracle_vbox.asc -O- | sudo apt-key add -

Step 4. Run sudo apt-get update in the terminal.

Step 5. Open the Synaptic Package Manager.

Step 6. Navigate the origin repository of virtualbox.org, then install the latest version of virtualbox.

Step 7. Restart the Ubuntu machine.

Step 8. Go to System > Administration > User and Groups. Click "Manage Groups" button. Find the "lp" and "vboxusers". Open its properties by clicking "Properties" button. Then ensure your username is check-listed.

Monday, April 26, 2010

Nge-torrent pake Transmission di Linux Ubuntu

Istilah-Istilah dalam Torrent

Berikut beberapa istilah yang sering digunakan:

Seeder adalah orang/user yang mempunyai file yang komplit (sudah terdownload seluruhnya) dalam komputernya.

Uploader adalah orang yang mengupload file .torrent ke web. Dia inilah yang menjadi Seeder yang pertama kali.

Leecher adalah orang yang sedang mendownload tapi tidak mempunyai file yang komplit (belum terdownload seluruhnya), juga dikenali sebagai Peer. Leecher akan mendownload file dari seeder dan leecher, dan juga akan mengupload "pecahan" atau pieces file yang dia miliki kepada Peer/Leecher lain yg tidak mempunyai "pecahan" file tersebut.

Tracker adalah engine script yang menyimpan "track” atau jejak dimana saja Seeder/Leecher berada (berdasarkan alamat IP) dan bagian file apa yang Seeder/Leecher miliki.

Ratio adalah perbandingan jumlah ukuran file yang diupload dengan jumlah ukuran file  yang didownload. Atau disebut juga stats.

Torrent Client adalah program/software atau aplikasi yang digunakan untuk mendownload Torrent. (seperti bit-torrent, µTorrent, Azureus/Vuze, BitTornado, Transmission, dll)


Definisi

Torrent itu adalah sistem download yang berbasiskan peer to peer. Dalam arti mudahnya sistem ini tidak punya server dedicated. Semua orang yang mendownload, akan otomatis menjadi "server" juga. Tentu saja speednya akan berbeda dari download biasa. Anggap mudahnya begini: orang-orang yang mendownload saling bagi-bagi atau saling copy satu file yang sama.

Ada banyak keuntungan mendownload file dengan menggunakan torrent. Dengan torrent kita bisa mendownload banyak file sekaligus, bahkan tanpa takut bila koneksi internet kita putus, atau komputer kita hang, sebab file torrent didownload secara terpisah melalui pecahan-pecahan kecil (pieces) sehingga bisa untuk disambung kembali. File yang belum selesai di download bisa didownload di waktu lain. Kita bisa meninggalkan aplikasi torrent mendownload secara otomatis sehingga anda tidak perlu menunggu sampai file tersebut 100% selesai.

Proses download torrent sendiri ada 2 tahap. yang pertama adalah mengambil file .torrent dari situs-situs penyedia file torrent (misalnya isohunt.com) terlebih dahulu. File .torrent ini adalah semacam file sementara yang berisi data link tracker dari file yang akan didownload. kemudian file .torrent tersebut untuk dibuka di aplikasi Torrent Client. dan proses download pun dimulai.

Perlu diperhatikan bahwa semakin banyak peer dan seeder yang terhubung dengan komputer kita, semakin cepat proses downloadnya. Hal ini dikarenakan kita mendownload file tersebut dari banyak sumber, berbeda dengan cara download tradisional dimana kita mendownload file dari satu situs sehingga semakin banyak orang mendownload pada situs tersebut, semakin lambat prosesnya.


Step by Step Download Torrent di Linux Ubuntu dengan Transmission

1. Arahkan browser ke http://releases.ubuntu.com/lucid/. Lalu cari file yang berekstensi-kan .torrent. Lalu diklik, kemudian muncul kotak konfirmasi download. Pastikan pilihannya ke "Open with Transmission". Lalu klik "OK".


2. Aplikasi Transmission akan terbuka dan terdapat kotak dialog konfirmasi download untuk torrent tersebut. Lalu Klik "Add". Dan proses download pun dimulai.


3.Lalu kita akan meng-customize proses download. Klik toolbar "Torrent Properties". pertama-tama akan terlihat data statistik torent yang kita download.


untuk melihat statistik peers klik tab "Peers".


Untuk membatasi proses download dan upload, klik tab "Options". Ambil contoh, proses download dibatasi 10 kbps saja, dan proses upload dibatasi 1 kbps. Pembatasan ini penting agar tidak memberatkan bandwidth secara keseluruhan.


Jika kita ingin tetap berbagi walaupun file sudah selesai ada baiknya pula mengeset ratio pembagian file atau seeding pada pilihan Seed-Until Ratio. Misalnya kita mendownload torrent sebesar 200 MB. Lalu kita set ratio-nya "2". maka ketika jumlah yang kita upload mencapai 400 MB, torrent akan otomatis dimatikan atau diputus.


4. Jika kita bermaksud untuk mematikan komputer dalam waktu lama atau pun ingin tidak lagi "berbagi" file, kita bisa mem-pause terlebih dahulu torrent tersebut dengan mng-klik tombol "Pause torrent", lalu kemudian dilanjutkan di lain waktu dengan meng-klik tombol "Start torrent".


5. Setelah file selesai terdownload, jika kita ingin ke tempat file tersebut di simpan, klik kanan saja pada torrent tersebut, lalu klik "Open Folder".

Tuesday, January 27, 2009

Ubuntu Screencast with RecordMyDesktop

Horaaay...finally We found a way to record our ubuntu dekstop session by using Recordmydesktop. At the first time we played it with Totem Player, it just looks good. But when we uploaded it to youtube, we felt that there was something wrong with the video format. it was just not good enough, too blurry. What do you think?

Saturday, January 24, 2009

Installing Wbar in Ubuntu 8.10

Wbar is a quick launch bar. It's developed with speed in mind and is highly tweak-able. It’s more than an application launcher, because It doesn’t let you “dock”  programs, but it can launch useful number of applications.

So Why using Wbar anyway? because :
  • It's cool eye candy
  • It's designed with speed in mind
  • It's coded in c++ using imlib2
  • It's lite & fast
  • It's released under the General Public License (GPL), so it's free.
The best part of this little “dock” is that it doesn’t need a composite manager to run, such as compiz, etc. So it’s perfect to add some eye-candy if you are running low-end hardware.

So, Let's begin by installing it.

1. Download .deb file here 
    2. Run the .deb file to install wbar. Click "Install Package" to get started.
      click for larger images

      3. Before running the wbar application, there might be some consideration :
        • Wbar looks perfectly in non-composite manager condition. you can see the difference as follows :
        with compiz enable (click for larger image)


        with compiz disable (click for larger image)

                 So, it's recomended that any composition manager is disabled.
        • Wbar would not run optimally if it's placed above or under the panel, because some part of it is hidden behind the panel.
         at the bottom position behind the second panel (click for larger image)

        Wbar at the top position behind the main panel (click for larger image)

        • So, It's recomended if all panel placed at the bottom, while Wbar is placed at the top.
        Wbar at the top position, and all panel at the bottom (click for larger image)


        4. To lauch Wbar, Press "Alt+F2" and insert this code :

        to refresh the Wbar view, just simply right-click at the Wbar area.


        5. To get Wbar running from the start, just go to
             System>Prefferences>Session
        click for larger image


        z`6. In The Session Prefferences window, click "Add".
        click for larger image


        7. In the Add Startup Program window, fill Name and Command Subjects as follows :
        Name         :  wbar
        Command  :  wbar -bpress -above-desk -pos top -isize 40

         
        click for larger image

        Click "Add" to proceed. Then, click "Close" in Session Prefferences window.
        click for larger image

        Tuesday, January 20, 2009

        How to Install Ubuntu Tweak

        Tweaking Ubuntu can be done in many ways, but in complex ones also. For Common User, Ubuntu Tweak is an application designed to config Ubuntu easier for everyone.

        It provided many usefull desktop and system options that the default desktop environment isn’t provided.

        Features of Ubuntu Tweak
        • View of Basic System Information(Distribution, Kernel, CPU, Memory, etc.)
        • GNOME Session Control
        • Auto Start Program Control
        • Show/Hide and Change Splash screen
        • Show/Hide desktop icons or Mounted Volumes
        • Show/Hide/Rename Computer, Home, Trash icon or Network icon
        • Tweak Metacity Window Manager’s Style and Behavior
        • Compiz Fusion settings, Screen Edge Settings, Window Effects Settings, Menu Effect Settins
        • GNOME Panel Settings
        • Nautilus Settings
        • Advanced Power Management Settings
        • System Security Settings

        So Let's start our first step by installing in your ubuntu machine:

        1. Go to System>Administration>Software Sources. You will be prompted for admin password to continue.
        click for larger image

        click for larger image


        2. Go to Third Party Software. Clik "Add" to add the following two sources :
        deb http://ppa.launchpad.net/tualatrix/ubuntu intrepid main
        deb-src http://ppa.launchpad.net/tualatrix/ubuntu intrepid main

        click for larger image

        Click "Add Source" each times you want to enter one source.
         
        click for larger image
        Click "Close" after you see those two sources listed.
        click for larger image


        3. Click "Reload" to updates sources list.

        click for larger image

        You will see the update process is underway.
        click for larger image

        4. Go to Terminal and install Ubuntu Tweak.
        code:
        sudo apt-get install ubuntu-tweak
        click for larger image

        5. To run Ubuntu Tweak, Go to Application>System Tools>Ubuntu Tweak
        click for larger image

        click for larger image

        refference :
        http://ubuntu-tweak.com/2008/12/15/ubuntu-tweak-044-released.html

        Friday, January 16, 2009

        How-to format USB Flash Disk using Gparted Partition Editor in Ubuntu

        Hereis a simple how to easily formatting your USB flash disk in Ubuntu :

        1. Install gparted package

        code :


        2. Plug in your USB Flash Disk into your PC.


        3. Run Partition Editor from System>Administration>Partition Editor

        Click for larger images

        Note : You will be prompted the admin password to get the application to run.


        4. Change device selection to your flash disk drive.

        Click for larger images


        5. Unmount The USB Flash Disk first. Right click the device on the list and pick "Unmount" option.

        Click for larger images

        6. Right click the device on list and pick "Format to", and then choose the type of file system.

        Click for larger images

        7. Click "Apply" to get formatting process executed.

        Click for larger images


        Click "apply" on the other windows to confirm the formatting.

        Click for larger images

        After the formatting process is done, Then click "Close".


        Click for larger images

        Wednesday, December 17, 2008

        Making your own keyboard app-launcher in Ubuntu

        One day I got this message in gmail ubuntu-id mailing list that someone requested a how-to add a keyboard app-launcher in Ubuntu. i tried to give him a closer solution, by pressing Alt+F2 and typing application name; or by adding deskbar to main panel, pressing Alt+F3, and then typing three fore-letter of the application you want to run.
        is there simply just one shortcut for all these?

        Yes, there is...

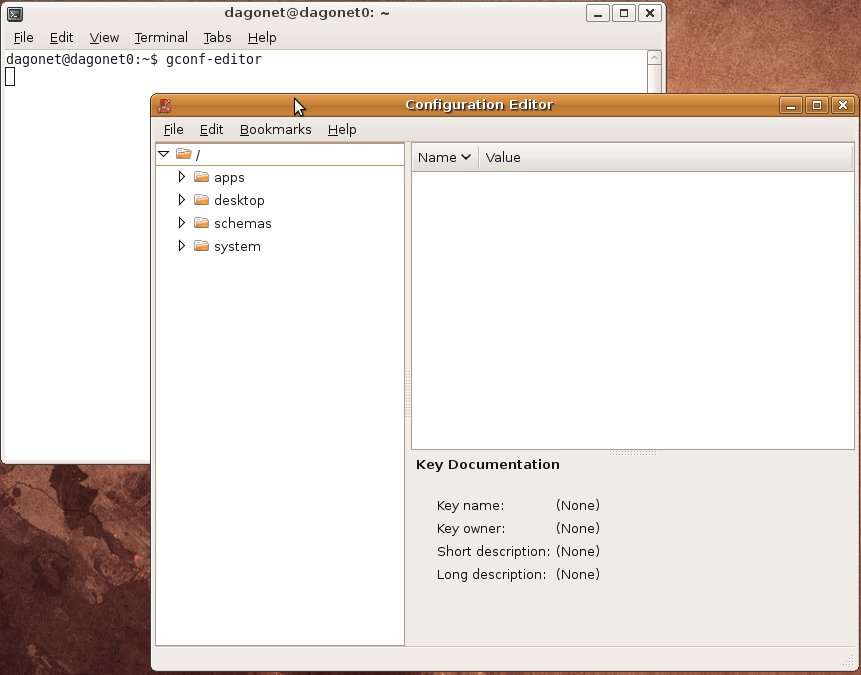
        1. Go to terminal, run :
        gconf-editor

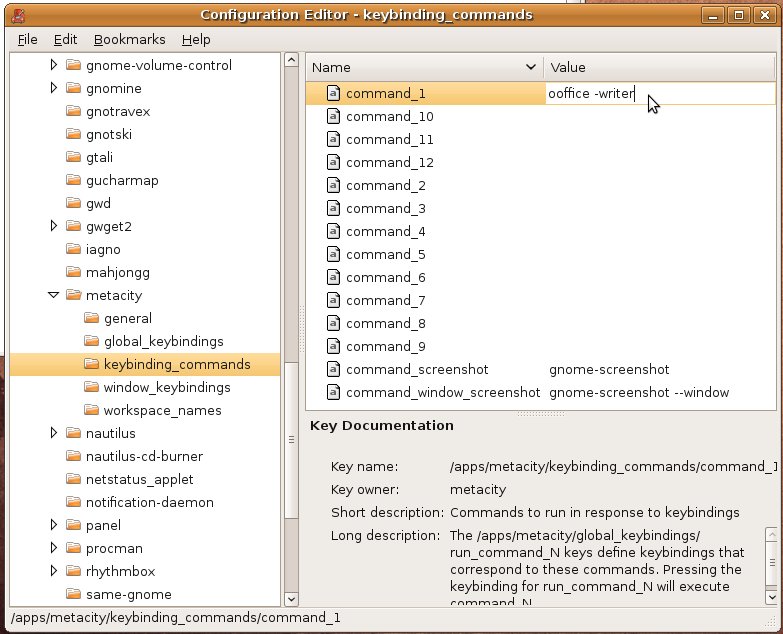
        2. In Configuration Editor window, Go to apps/metacity/keybinding_command.
        click command_1, and click it once at the it's "value" column, type the application you want.
        for example openoffice writer, which the command is ooffice -writer.
        then press Enter.
        you can also use other command_(1 to 12) that still has no value.

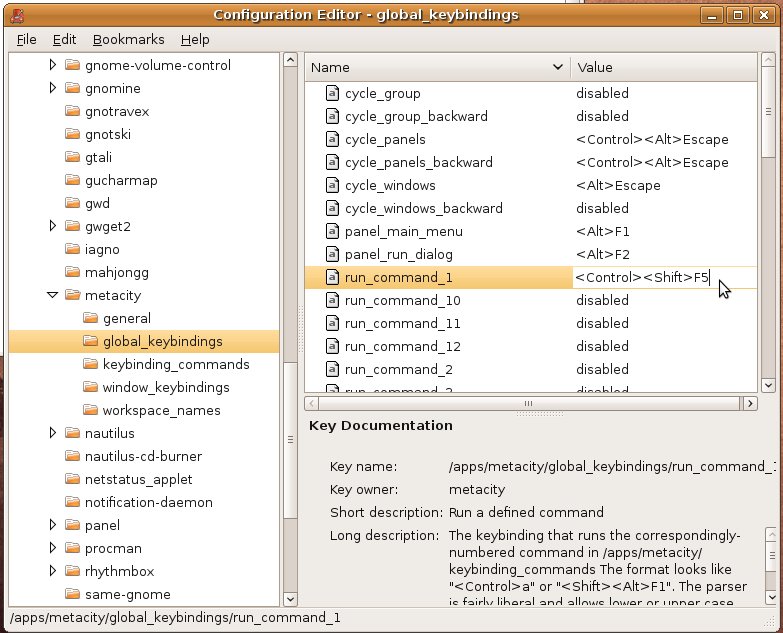
        3. Go to apps/metacity/global_keybinding.
        Find run_command_1, dan click it once at it's "value" column.
        Add your own shortcut, which is not have used before. for example Ctrl+Shift+F5. Type it like this <Ctrl><Shift>F5
        Close the Configuration Editor window.

        4. Now try pressing Ctrl+Shift+F5.

        Monday, December 1, 2008

        Updating Application from Local Mirror Repository (Part 2 of Updating Ubuntu from Local Mirror)

        After doing additional of local mirror repository, we can check any updates that available.
        For Example, I was trying to update Mozilla Firefox 3.0.3 to 3.0.4 version. Here are the step by step instructions :


        1. Go to System/Adminstration/Update Manager.


        or simply by clicking red arrow with exclamation mark ( ! ). You can see how many updates available if you placed the pointer on the arrow.


        2. The Update manager window will be opened and showing all updates available.


        Since we only update the firefox 3.0, right click on update list, and pick "Uncheck All".


        3. Pick Firefox 3.0 related packages to update the Mozilla Firefox application. Then click "Install Updates" button. You will prompted for admin password to go through.


        4. Just wait the update process to be completed. Then, close Update Manager window.


        5. Restart firefox to see the update change.